Application Builder Guide
This guide explains special considerations for creating executables using the LabVIEW Application Builder.
1. Project Dependencies
There are two files which are required for any Application Builder project.
1.1. labSSH.dll
The file labSSH.dll must be manually added to your project.
Navigate to your LabVIEW installation’s <resources> folder, e.g.
C:\Program Files\National Instruments\LabVIEW 2017\resources
Drag-and-drop labSSH.dll to your project explorer window to add it to your project.
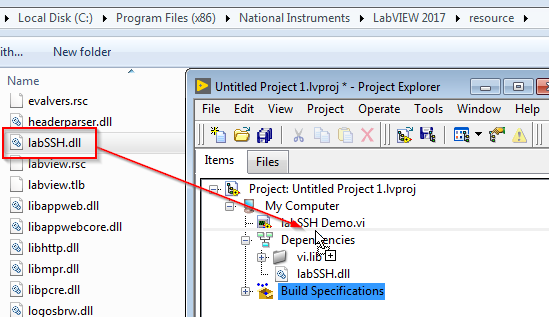
App. builder dragging labSSH.dll into project
1.2. labSSH.lic
Navigate to the base LabSSH installation directory, e.g.
C:\Program Files\National Instruments\LabVIEW 2017\vi.lib\Labwerx\labSSH\
Drag-and-drop labSSH.lic to your project explorer window to add it to your project.
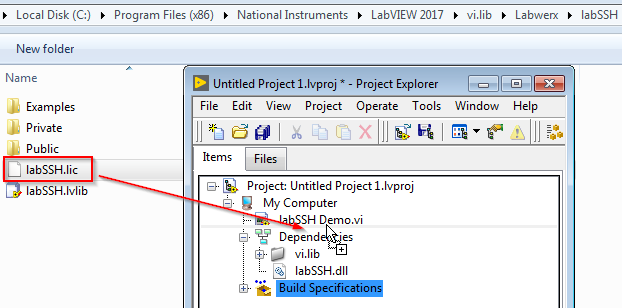
App. builder dragging labSSH.lic into project
1.3. Completed Dependencies
Here is what the project should look like after all dependencie have been added. Note the two instances of labSSH.dll.
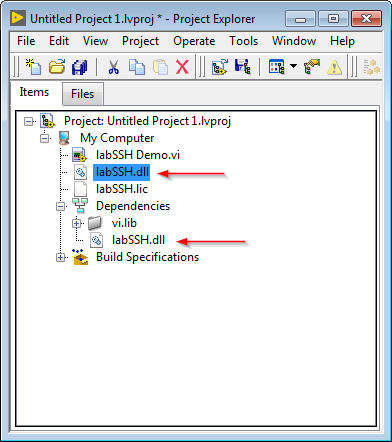
All dependencies added to project.
2. Init.vi and Path to labSSH.lic
Init.vi normally expects to find labSSH.lic in the default installation directory. For executables, this path needs to be overridden.
Wire a path constant into the License File Path Override input of Init.vi which reflects where the file will be placed by Application Builder.
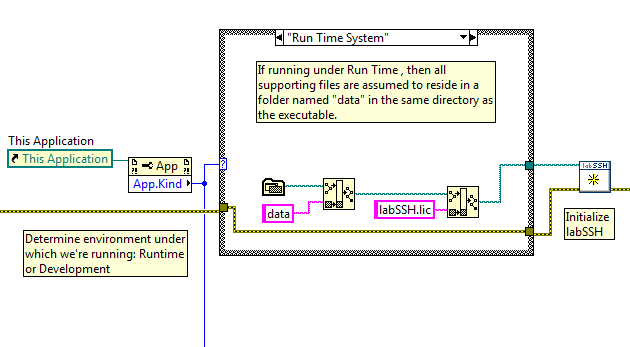
License file override example
The above screenshot expects the license file to be placed in a subfolder called data relative to the executable.
3. Build Properties
The Build Properties must be configured correctly in order to create an executable.
3.1. Source Files
From the Source Files category within the Application Builder Build Properties window, add both labSSH.lic and labSSH.dll to the Always Included pane.
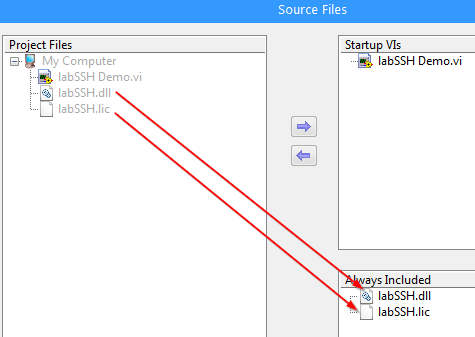
App. builder source files
3.2. Destinations
From the Destinations category within the Application Builder Build Properties window, create a new destination folder by clicking the + icon.

App. builder add destination folder button
Edit the Destination Label of the new destination folder to match the directory of the application executable. This is important!
Edit the Destination Name of the new destination folder. This example uses Exe Directory to indicate that it’s the same destination as the build executable.
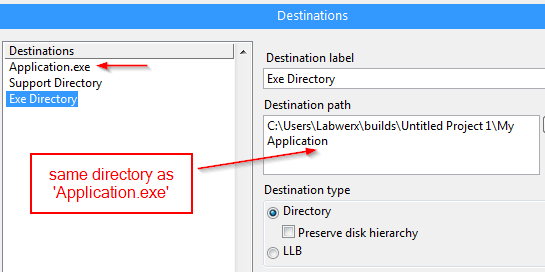
App. builder destinations
3.3. Source File Settings
From the ‘Source File Settings’ category of the Build Properties window, change the destination of labSSH.dll to the previously created Exe Directory destination directory.
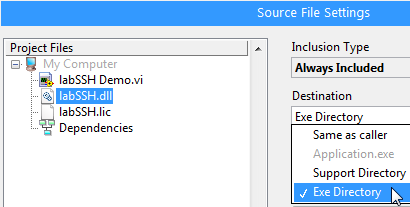
App. builder source file settings
3.4. Additional Exclusions
Warning
This step is no longer necessary as of the 2.4 release.
LabSSH releases prior to 2.4 still require this step.
Changed in version 2.4: This step is no longer necessary.
Finally, from the Additional Exclusions category of the Build Properties window, uncheck the boxes Remove unused polymorphic VI instances and Disconnect unused inline subVIs.
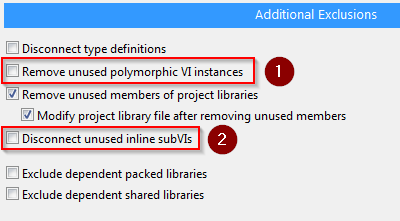
App. builder additional exclusions
4. Microsoft Visual C++ Redistributable
For 32-bit LabVIEW executables, you must install the Microsoft Visual C++ 2010 Restridributable Packackage (x86) on the target computer.
Similarly, for 64-bit LabVIEW executables, you must install the Microsoft Visual C++ 2010 Redistributable Package (x64) on the target computer.
labSSH.dll depends on this package, and LabSSH will not run without it.
Distributing these packages to your target computers is beyond the scope of this document.
5. Conclusion
In this guide, you have learned about the requirements for successfully building and distributing a LabSSH-powered executable.